Teaching Children About Charity

The winter holiday season is a good time to teach your young children the gift of charity, however there are many opportunities year round to practice being charitable. Let’s explore a few charitable ideas.
First, children between the ages of three and four are beginning to learn that other people have feelings. At this age children develop and hone a sense of empathy; the very basis for charity. Let’s start early teaching charity to our pre-schoolers.
To begin with, charity begins in the home with the family. Parents are closest to the young child and can set the best example most easily. A great way to reinforce charitable values is to make giving a regular fun filled family activity. The best charitable activities are those that connect with your child’s everyday experiences or interests. It is easiest for younger children to understand direct and concrete examples of charitable giving. For example, encourage your young child(ren) to donate their outgrown toys and clothing to other children. You might even start with an older sibling passing his/her things down to a younger sibling, cousin, family friend or a neighbor’s newborn.
Food is always most welcome at your local food pantry. Pick up an extra can a week and put it aside for a special trip to the food pantry. Purchase toiletries or write a letter for servicemen and women serving overseas. If your child is interested in animals you might donate food and blankets to an animal shelter. Collect hats, mittens, coats and/or diapers. There are many organizations that collect any or all of the above. Imagine the “feel good” sense when teaching your child to care about others.
Additionally, encourage everyone in your household to participate in volunteer activities. Many organizations need a helping hand. Praise your children when they show generosity and empathy to others. When you help out with your gift of time at a charitable event, a soup kitchen, or picking up trash, ask your children to join. Bake or rake leaves for your neighbor. Remember that children learn what they live. Kids thrive when they feel a sense of responsibility and will get involved with any activity that makes them feel empowered. Teach pre-schoolers that they are part of a larger community, and that we are all responsible for everyone around us. Don’t you want to live in a world where people care about one another?
You are your child’s first teacher.
Cinnamon Dough Ornaments- Pre-School Cooking Project
Cinnamon Dough Ornaments
I want to share with you a fun, aromatic, yearly tradition of making cinnamon dough ornaments. On the day we make these decorations the entire child care center smells absolutely wonderful and we love that! We get the same reaction from families when we make popcorn. It is important to our senses to surround ourselves with “good” smells.
To begin gather a large bowl, mixing spoon, cookie cutters, ribbon and the 2 ingredients required for this recipe, cinnamon and applesauce. The amounts are listed below. Since there are only two ingredients in this recipe, cinnamon and applesauce, it is fairly easy to do with young children in a group childcare setting.

Making Cinnamon Dough Ornaments
Recipe
Cinnamon Dough
½ cup cinnamon
½ cup applesauce
Pour cinnamon and applesauce into a bowl. Mix until the mixture turns into dough.
It is so much fun to hear the children try to say “cinnamon” as we discuss and measure the ingredients for the project. Mix the ingredients together remembering to use rich vocabulary as you mix the dough. Give each child a small ball to play with, this activity helps children to strengthen the small muscles in the hand which are used in writing! The dough also keeps the children busy and allows the parent/educator time to work individually with each child to roll out the dough for cutting with a cookie cutter.
Roll out your dough to your desired thickness. We have been rolling out 1/4” slabs. This thickness works well with special holiday shaped cookie cutters and it stays solid for putting a hole in for hanging. We like to make snowflakes, Santa Claus, reindeer, snowmen and stars. After you shape the dough poke a large hole with a straw in the top of the ornament This is for stringing after the ornaments dry.
The dough stores nicely in the refrigerator for several days if you want to return to the project.
It takes about four days for these ornaments to dry, please keep this in mind as you plan your holiday activities. Turn the ornaments daily for best results. We tie ours when dry with a pretty ribbon. Once they are dry they last for years and will retain their cinnamon scent for many, many seasons to come.
What is your favorite holiday tradition?
Benefits to Sharing time in the Kitchen with Children
A quick word about cooking with your nursery school aged child!
Young children love to prepare and cook foods. This week we will look at some of the benefits of cooking with your child and I will share with you a recipe for a snack we like to make at Thanksgiving time.
But, first the benefits of sharing time in the kitchen.
Physical Development: Small motor skills such as slicing, chopping, dicing and whisking help to develop pincher control which is needed for writing. Large motor muscles are developed in rolling, mixing and pouring. Another added benefit is developing good eye hand coordination.
Early mathematical skills: You will be counting and measuring. Volume, fractions, numbers, size, and shape are all skills that can be developed while cooking with your nursery school aged child. Practicing mathematical vocabulary and concepts such as less than, equal to, and as much as are easily accomplished while in the kitchen. Children learn sequencing and time in making a dish.
Science Skills: While you are cooking you will explore the concepts of temperature (hot-cold), liquid to solid and solid to liquid, cause and effect, and making predictions. You will be using your senses of touch, taste, smell and sight.
Social Development: In this area your child will learn working together cooperatively and sharing space. He/she will be gaining self confidence while using kitchen tools appropriately. Your child will learn and then practice kitchen rules for safety. Self control and patience are additional areas of learning in the kitchen.
Language development: Your young child will be developing important pre-literacy skills. Building vocabulary is natural. Don’t you just love it when a young child whips out a “big” word? Don’t be afraid to use words like sauté and julienne. You will be modeling functional reading when pointing out that words make up the ingredient list, and instructions that make up a recipe. Your child will be listening to follow directions, and recognize sequential events.
Social Science: There are many children’s books that depict other cultures and their foods! Learn how to make something from a culture other than your own. Ethnic foods are just one area where you can practice diversity and acceptance.
Have fun in the kitchen!
Thanksgiving turkey chocolate dipped pretzel
Sugar Cookie Recipe
1 cup butter, softened
2/3 cup sugar
1 large egg
¼ teaspoon baking powder
1/8 teaspoon of salt
1 ½ teaspoon vanilla
2 1/3 cups all purpose flour
Using an electric mixer, cream the butter and sugar until very fluffy and well blended. Add and beat in the egg baking powder, salt and vanilla until evenly mixed. Stir in flour until well blended and smooth.
Or buy a mix and follow the instructions
Confectioners Frosting Recipe
4 cups confectioner’s sugar (icing or powdered sugar), sifted
1 cup unsalted butter, room temperature
1 teaspoon pure vanilla extract
4tablespoons milk or light cream
Assorted food colors (if desired)
Or buy a can and open
Other ingredients
Pretzel rods
8 oz bag of chocolate chips or microwavable dipping chocolate
White frosting
Food coloring
Supplies
Mixing bowls and mixing spoons
Measuring cups and measuring spoons
Double boiler
Baking sheet
Skewers
First make your sugar cookie
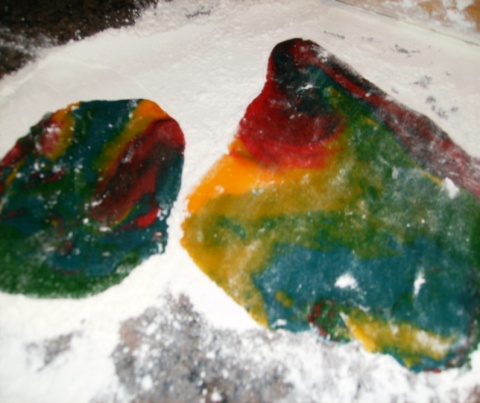
Divide the dough into smaller balls for coloring. I used 4 colors so I made 4 small balls.
Add food coloring and mix each ball separately.

Blend all your smaller colored balls gently. Be careful not to over mix.

Flour a flat surface. Gently roll out your dough, again be careful not to over mix. Use a leaf shaped cookie cutter to cut the cookies. A circle would work as well.

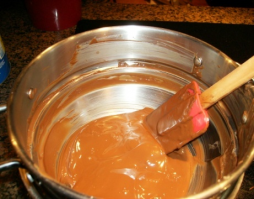
Use a double boiler to melt you chocolate chips. Add a little tablespoon of butter, margarine or oil if the chocolate seems too thick for dipping.

Set up for the next step. Lie your cookies out on a cookie sheet. I used bamboo shish k bob skewers to make the pretzel level with the cookie for a solid chocolate bond. You don’t want your cookie to fall off!
Now dip the pretzel rod into the melted chocolate, stick it to the cookie and let harden.

 Mix up white frosting. With food color make one third
of the frosting yellow and one third of it red.
Leave the remaining one third white.
Now you are ready to pipe on two eyes, a beak and a wattle. If you do not have a pastry bag, snip a hole in the corner of a plastic sandwich bag. Let dry and enjoy!

Is reading to your preschooler important?
Is reading to your preschooler important?
Since November is National Literacy month, let’s talk about literacy. At Friendship Garden Nursery School one of our favorite past times is reading and the activities that accompany story time. To read for pure joy with enthusiasm make learning speech, language and per-literacy skills fun.
 Along with The American Library Association I will share some tips for enjoying books with young children.
First you will need reading material! Have your child select books. Choose a variety of subjects, some that your child is familiar with and others that will broaden their knowledge or prepare them for an upcoming event, like going to the dentist. Choose books with a variety of illustrations, humor, color and information. Young children enjoy rhyme and repetition. The library is a great resource!
Next find a comfortable place to sit, most young children like to be close, in our nursery school we allow for closeness at story time. Please recognize that some children need space and are uncomfortable with being to close so be sure to accommodate for that as well.
Make sure that there are no distractions or at least minimize them! Silence phones and make sure that there will be no one passing through your space. Be sure to take care of both yours and your child’s physical needs such as the bathroom and a drink of water.
Hold the book so your child can see all pages clearly. In nursery school this means holding the book in such a way that all can see the illustrations. We always start by orienting the book by locating the front and back. Read the name of the author and illustrator along with the title. Let your child predict what the book might be about by looking at the picture on the cover.
While you are reading, have your child point to objects, talk about the pictures or repeat common words. Bring your child’s attention to look for certain things within the book, (like the blue ball). Use descriptive words. Don’t forget to read with expression. Nursery school children love to hear you make different voices. Allow them to repeat phrases, make animal noises or anything else that seems natural to enhancing the story.Vary the pace of your reading as this helps to hold their attention as well. Increase your child’s vocabulary when you encounter new words give a brief definition of the word. Ask a variety of wh- questions (who, what, why, when, where), answer questions, make predictions and in general have fun reading.
Your child will ask to read the same book again and again, reread your child’s favorite books whenever asked repetition is the key to learning so read books over and over again! Soon you will be able to recite or sing rhymes from your favorite books.
After reading help your child to retell the story in sequential order using his/her own words. Ask your child if he/she enjoyed the story and why.
Reading is the backbone for all learning, make reading a habit.
Improving behavior
A sigh of relief: Routines
Let the wild rumpus end! I can hear a collective sigh of relief from parents of pre-schoolers. It is time to go back to school, back to “normalcy”, and maybe even time to grab a moments peace when the little ones go to pre-school.
We’ve all had fun and stayed up too late but now it is time to get back on track. Time to get back into the school year rhythm after routines have been broken, limits stretched and boundaries redefined. You are ready for a break!
Children need routines, boundaries and limits to feel safe at home and at pre-school. Children have almost no control over their lives and routine offers stability and comfort. Routines ensure for children that their basic needs will be met. The added benefit is that pre-schoolers are learning good behavior and good habits.
At pre-school we have established routines that basically do not change. Our flexibility lies in that the pre-schooler cannot tell time so the order of things is what becomes important. You can create that same type of order at home.. First we do this and then we do something else.
Here are a few suggestions for either creating routines at home or transitioning back to routine if you have lost it during the summer/holiday break.
Waking up should be around the same time everyday.
The routine of washing up and brushing your teeth establishes good hygiene.
Pre-schoolers love to get themselves dressed, make sure that you have seasonally appropriate clothing in their drawers and let them choose their outfits. Anything goes as long as it is seasonally appropriate.
Remember to have regularly scheduled meal and snack times, children need reassurance they will eat.
Have bedtime ritual and routines, if this has been upended during the summer/holiday break, try to ease back into your regular, earlier time a few days in advance of going back to school. This way everyone is refreshed and ready to go.
Have a special place for items that are going back to school so that they are easily located during the hectic morning pace.
Once you establish and/or stick to a routine, you should notice an improvement in behavior.
Enjoy the last few days of summer break.
See you back at pre-school.
Pre-School Graduation Project, Falmouth, MA
A Fun Pre-School Graduation Project
It’s graduation time! From pre-school and middle school to high school and college there are many graduation celebrations. This is a quick, easy and fun snack that a colleague first made for our Falmouth, MA pre -school children years ago. I have made these sweet treats for many graduation parties. They are always well received and the platter is empty at the end of the event!
Today I made graduation caps with a small group of my Falmouth MA pre-school aged children for their teacher who is about to graduate from college.
 We started by washing our hands and gathering our ingredients:
Chocolate covered graham crackers (square) OR square of chocolate (in this post we used chocolate covered graham crackers)
Fruit roll ups (pick a flavor /color to coordinate with school colors)
Mini Reese’s peanut butter cups
Small bag of M&M’s
SassieSap, icing OR melted chocolate (in this post we used SassieSap)

Unwrap a Reese’s peanut butter cup. Squeeze a small dab of SassieSap, to the bottom of the Reese’s peanut butter cup. (See photo with cute little Falmouth MA pre-schooler’s hand!)

Place a square chocolate graham cracker on top of your SassieSap dab.

To make the tassel, unroll the Fruit Roll Up, keep it cool so it is more manageable. Cut off a strip using scissors. It will need to be long enough to hang over the side the cracker. Use a pair of scissors to fringe the bottom with a few cuts. You should not worry if it looks like a scarf you will arrange it so it doesn’t in the next step!
 Add a dab of SassieSap to the center of the top of the graham cracker. Position your fruit roll up tassel. Using another dab of SassieSap, place an M&M in the center of the graham cracker right over the end of the fruit roll up tassel. Remember to use coordinating school colors if so desired! Let dry.
Place on a platter and enjoy!! Congratulations graduates from pre-school on up!
Friendship Garden Pre-School Hatching Project
Our Falmouth MA pre-school hatching project
Every year at our Falmouth MA preschool we put a few fertile eggs into an incubator and hope for good results.
Before you set forth on this project be sure you are either able to raise the chickens properly or you have a reliable backyard farmer who will take your chicks. While they area fun as babies, they quickly outgrow being an indoor preschool project.
 We have a backyard chicken coop and we are ready to increase our flock.
This year we bought 12 eggs from a farmer on ebay. We chose the breed, Cuckoo Maran, since you are supposed to be able to sex them by the color of their down when they are small chicks. This was important to us since 2 years ago we raised 3 beautiful ROOSTERS. Boy did they fight! They had to be hauled off in a farmer’s truck!
The 12 eggs went into the incubator and we started our 21 day countdown. We faithfully monitored the temperature and turned the eggs 2-3 times/day. We began every morning with an all preschool assembly to discuss the project.
Day one. We open a raw egg from the grocery store and examine it. We start learning the vocabulary associated with the project: incubator, temperature, thermometer, 100 degrees, embryo, yolk , chicken, hen, rooster to name a few. It is fun to hear the children tossing these new words around.
Days 2-6 Our Falmouth MA nursery school children make sure that each day  before handling the eggs I wash my hands. We have learned that eggs are permeable and we don’t want to compromise our project with germs. We read different stories, some fiction, some non-fiction. Every day we open another of our plastic eggs to see what our chicks should look like. (see photo)
Day 7 We are able to “look” into our eggs by candling them. During this process we concentrate a strong light on each of the eggs individually to try to see the air sac at the bigger end of the egg. We find one egg where we can clearly see the yolk and no developing chick. In the rest of the eggs we can see that the chick is developing and the air sac is evident. Candling is harder to do on Cuckoo Maran egg since it has a darker shell than some breeds.
Days 8-20 Time is passing quickly as we have weekends to account for in this 21 day process. We continue to turn the eggs, read stories, ask questions and hope for chicks. Our Falmouth MA preschool children have begun discussing names, something I have to shy away from in case nothing hatches. We learn more vocabulary: embryo, membrane, wattle and comb.
Day 20 We use another grocery store egg and this time we each try to break it open using our index finger nail to get an idea of how much work it will be for a little chick to break the egg shell. We find out it is very hard to break an egg. The chick will be very tired when it hatches. We set up a brooding box with a nice warm light. We have a fun pre school discussion, “which came first, the chicken or the egg?” 
We are ready for hatching day.
Day 21 We can hear the peeping, we see a pip in one egg. All day there is no progress. (see photo)
Day 22 We arrive at school and we have 5 chicks. There are cracks in 2 more eggs. Over the next day we end up with 8 chicks in all.

Giving up the Binky/Pacifier
Giving up the Binky/Pacifier!
Is your child still attached to his/her pacifier and you have long
since decided it must be time for him/her to give it up? Is this the
right time? How do you do it? Families ask the question at nursery
school often. Here is a clever solution, if you are ready!
Make an arrangement with the mom of a new baby: a friend, a relative,
a play group mom, a mom with an infant in tow at nursery school. Have
your child gather all the binkies or pacifiers that you have, you know the ones!
They are everywhere, in your purse, in the car, in the cabinet and
under the furniture. Your little one knows where they are as well,
since he/she has them hidden!
After your gathering period, let your child decide how to wrap, bag or
box these prized possessions. Make a big deal out of packaging them up
nicely to give to the new baby! On the given day, let your child hand
over the package. This gives the child power in the situation and
leaves the responsibility for giving them up in the child’s hands. If
your first attempt fails because there was one pacifier or binky left behind
that your child finds. Repeat the process! Cross your fingers that
binkies or pacifiers are a distant memory as you face new parenting challenges.
Remember that your child’s nursery school educator is a wealth of
information and resources he/she is willing to share.
Glitter Play Dough Winter Activity
Glitter Play Dough Got the mid-winter blues? Play dough, parents dislike, our Falmouth MA preschool teachers love. Along with strengthening the muscles of the arm and hand, a prerequisite for writing, play dough has a wonderfully calming affect. February is a perfect time to make play dough when mid-winter restlessness is apparent in the preschoolers’ antsy bodies. To add interest to the play dough center at our Falmouth MA preschool, we jazz it up by adding glitter to our standard play dough recipe! The children are always amazed and amused. Add a few holiday/seasonal paper plates, some cookie cutters, rolling pins and plastic knives and let the creativity fly. Try this with your preschool aged children, it’s easy and fun!

Basic play dough recipe: In a large pot mix; 1 cup flour ½ cup salt 1 cup water 1 tablespoon vegetable oil 2 teaspoon cream of tartar food coloring Heat on low mixing until a ball forms and add ¼ cup glitter of choice, knead and play!
Winter Project for birds
During this season of doing too much, “The Night Tree” by Eve Bunting is a lovely story about slowing down for a minute and enjoying a simple holiday tradition. The story begins when a family bundles into a truck and drives to the quiet of the woods to decorate “their” tree for the forest animals. They put up strings of popcorn; they hang fruits and millet balls. After enjoying hot chocolate and singing, they leave the tree behind for the forest animals until next year.
In our Falmouth, MA nursery school we use this quiet story to help calm the craziness of the holiday season. After reading the story several times, our students love this idea and we then pick out the best tree for decorating on the play ground.
We make low cost treats to hang on the tree. Nursery school aged children can string cheerios on pipe cleaners or spread peanut butter with plastic knives on bagels, toast or apples rings and dip them in birdseed. Use cream cheese if you have peanut allergies in your home/class. We are lucky enough to have the local bagel shop or supermarket donate day old bread products to use.
Our nursery school students are awed when they see the birds (crows in our case) and squirrels foraging around their tree eating the offerings.
Enjoy this project!
